By popular request, I'm sharing the instructions to make this cake. It isn't Weight Watchers friendly or overly healthy (although many cakes are worse for you), but this blog seemed to be the best place to post that would be accessible to many.
I first made this cake in May 2008. We had a cooking competition in the office and I made 2 side-by-side cakes, one to take to work, and one to take to dinner at a friend's house that weekend. I tend to be creative, and had no idea what it would really take to make a cake with lots of layers, so I decided just to give it a try. I ended up realizing this cake was way more effort than I had ever dreamed - but oh my goodness, it is divine. Our friends who had it at dinner loved it, and I recently received a request from them (she is expecting) to repeat. Normally, I wouldn't invest so much time in a dish - but, as I know, people will go an extra mile for a pregnant person, so that's exactly what I did. I took pictures as I went so I could document the recipe for others to replicate. Maybe if they have lots of free time, they can make it for me? :-)
I also learned from some of the things that didn't go so well in 2008 and made it slightly differently this time.
2008 errors
-- Baking 3-4 cakes and slicing layers. It didn't work well because the cut surface of the cake tended to catch on the dulce de leche as I spread it, turning it into a crumbling glob
-- Not draining the juices from the peaches before slicing. It was a bit slimier than I would have liked.
-- Not slicing the fruit thin enough. The thinner, the flatter and more even.
So, step by step, this is what I did for the April 30, 2011 baby shower presentaiton of this cake. I strongly suggest reading the instructions end-to-end before you start, and also planning to divide the project over 2 days. At minimum, if you're very efficient but only have one springform pan, it could take 5-6 hours.
Tools

Pictured: spatula and springform pan.
You will also need:
-- nice platter or cake stand to present cake
-- wax paper
-- 2 large dinner plates (for stacking layers after they cool)
-- cooling rack
-- measuring cups
-- nonstick cooking spray
-- electric hand mixer
-- large mixing bowl
-- paring knife (for cutting fruit)
-- cutting board
-- small bowls/containers to hold cut fruit before it goes on the cake
-- large long knife (like a butcher knife - to be able to cross length of springform pan to separate cake)
Ingredients

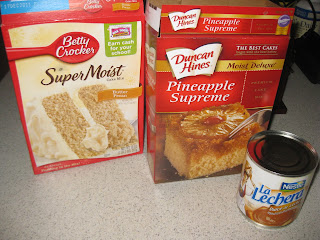
-- 2 boxes premade cake mix - I use pineapple and caramel/butter pecan
-- applesauce (in lieu of oil on cake directions, same measurement - it is more moist cake and a tad healthier, too)
-- water (for cake mix, quantity per box instructions)
-- eggs (for cake mix, quantity per box instructions)
-- 2-3 small cans of dulce de leche (I used 2 this time, you may need 3 depending how generously you apply the dulce de leche)
-- fresh fruit. For this cake, I used the following:
*1 small container strawberries
*3 kiwi
*1 container blueberries
*1 16oz can of pineapple rings
*1 16oz cans of peach halves in light syrup
Instructions
Part A - The Cake Layers
1. Preheat oven per directions on cake box.
2. In large mixing bowl, make cake batter for your first flavor per box directions but use the applesauce in lieu of oil. Blend well with hand mixer. You will have approximately 5 cups of mix.
3. Coat bottom and sides of springform pan with nonstick cooking spray.
4. Measure 1/5 of the batter (about 1 cup) and pour into the springform pan. You can use a spoon to spread it out or tilt the pan side to side. The batter will just barely cover the bottom of the pan (this is going to be one of many thin layers).
5. Bake the cake until the edges are golden and pull away from the sides, and you can put a toothpick or knife in and it comes out clean. For example, my box suggested 30-35 minutes for cooking two 9" cakes, however since there was much less batter, I found that I needed 18-19 minutes per layer.
6. When cake comes out of oven, use pot holders while still hot and release and remove the sides of the spring form. While holding bottom layer of pan with cake in it using a pot holder, take the long knife and slide it under the cake, fully separating it from the pan.
7. Put the cooling rack over the top of the cake, then using pot holders, flip the pan/cake/cooling rack together so that the cooling rack is on the bottom. Now, remove the pan and you have a layer of hot cake on the cooling rack.
8. Take the springform pan (base and sides) to the sink, rinse out to remove any residue from the cake, reassemble.
9. Repeat steps 3-8. As one cake layer is getting ready to come out of the oven, the preceding one should already be cool and relatively firm (firm enough to hold with your hands). I've found that when I cook with applesauce instead of oil, my layers usually come out pretty flat. If it's slanted from one side to the other, don't worry - all layers may be slightly off, but you can arrange them so it evens out when you assemble the cake. However, if the middle of the cake appears significantly risen even after cooling off, you can use your large knife to slice off the risen part and discard it so that you are left with a flat layer. I store the cooled layers on a dinner plate, with wax paper between each layer to prevent them from sticking. To transfer them, I usually cut a piece of wax paper slightly larger than the layer, put some nonstick spray on it, put it over the layer that is on the cooling rack. Then I flip it over so that the wax paper is on the bottom, and then shift that to the dinner plate.
10. After you have baked all 5 layers for the first flavor, repeat steps 2-9 for the second flavor. (19 minutes of cooking, plus coating, measuring, transferring to cooling rack --- multiplied by 10 layers, now you see why this recipe takes awhile).
11. The cooled cake layers can be stored overnight without refrigeration, I had one dinner plate for each flavor and put them side-by-side in the microwave so they would not dry out (or be subject to my pesky pets, who are creatures of the night looking for a good eat).
Part B - Preparing Fruit and Assembling
1. Rinse blueberries and straberries.
2. Open cans for pineapple rings and peach halves and drain any liquid from the cans.
3. Peel kiwi.
4. Other than the kiwi, slice the fruit very thin (1/8 inch or so), and keep each fruit separate in its own bowl. I actually take the pinepaple rings and slice them in half cross-wise to cut down the thickness.

5. Get the plate you are planning to assemble the cake on (a nice platter or cake stand) and grab the first layer of cake (pick a flavor). Put the side of cake that was on the top when cooking facing upward (the 'cooked side' that wasn't facing the pan bottom). This will minimize the amount of crumbs that stick to the dulce de leche and is the whole purpose of baking the individual layers.

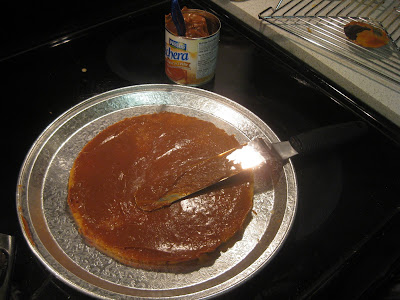
6. Open the dulce de leche, and with the spatula take 1/3 of the can contents out and spread thinly over the cake layer. Take a little more dulce de leche if needed to cover.

7. Now, pick one fruit to be your first filling. I considered the colors of the fruit I'd chosen and picked an order that would alternate colors between the layers. Spread those thin pieces of fruit onto the cake, covering the dulce de leche. You will not use all of any fruit on a single layer, which is expected. You'll want to save some for the top, and if there are leftovers - it's a healthy snack :-) Each layer, you can do something different. And, if you're worried you'll run out of a fruit (like, I did not have enough blueberries for a full layer), you can do one fruit outside (for external viewing of cake) and then just fill in with another fruit in the middle.

8. Now, pick a layer of the other cake flavor so you'll have alternating flavors. Place it on top of the cake/dulce de leche/fruit that you already assembled. Eyeball the cake to make sure it is relatively flat, rotate the layer if it isn't (I find things don't always bake evenly, but if I put a thick side opposite a thin side, in the end the cake isn't too slotted).
9. Now, repeat the dulce de leche, fruit, alternating cake flavor pattern for as high as you want to build the cake. For today's shower cake, I did six layers of cake, six layers of fruit (5 filling, plus one on the top). I saved the other layers of cake for the 'traditional' baby shower style cake that is more western. However, there is no reason you could not do a taller cake - that is what I did in 2008.


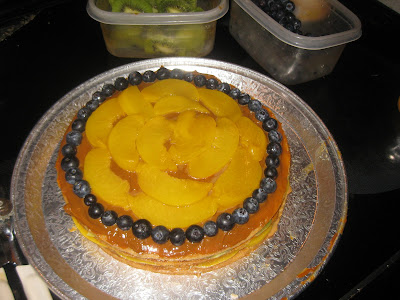
9. When you get to the top layer, put a slightly more generous coating of dulce de leche on the top. This will be holding in the fruit and there won't be any more cake on top of it. Then, arrange the fruit as you see fit. I've gone from inside out (2008, had a kiwi in the center and built out from there). And also have started with the outside, moving in (see 2011 picture, I started with the strawberries).
10. When done, take a picture because you're darned proud of the cake. Then cover with a cake dome or something that would not stick to the cake, and put in the fridge. Because if the cut fruit, this should not be left out overnight.

11. When it's time to serve, remove from fridge, cut, and enjoy.


Holy crap, I can't believe how much work that takes. But it looks amazing and I really want to eat a slice. Thanks for sharing Denise!
ReplyDelete